Roasted Carrot Dip

0311151653~2

Roasted Carrot Dip is my go-to party dish, and absolute favorite burger topping! This one is adapted from a recipe I found once in an old Martha Stewart magazine, but 0ver the years it has slowly morphed into something totally my own!

This sweet and spicy dip has got a Buffalo kick and makes a perfect dip for raw veggies, a salad fixin’, or burger topper. It’s also amazing on tortilla chips, or whisked into scrambled eggs! The recipe yields quite a bit – about 3 cups – It can easily be halved, but we never find any trouble devouring it all!

Roasted Carrot Dip
2 lb. Carrots, scrubbed and diced0310151632~2
1/2 c. Onion, chopped
1 1/2 tsp. Cumin
Oil for roasting (Olive Oil or Red Palm Oil work best)
Salt and Pepper
1 Clove Garlic, chopped
2 tbls. Red Wine Vinegar
3 tbls. Olive Oil
1 (or more) tsp. Hot Sauce (Frank’s Red Hot and Cholula are my favorite)
Red Chili Flakes (optional, to taste)

Preheat oven to 375. Spread diced carrots, onion, cumin, salt and pepper in glass baking dish and coat with oil. Cover with foil and roast for 30 min. Uncover, and continue to roast for an additional 30-40  min until carrots are very soft. Cool.
Combine carrots, garlic, vinegar, oil, hot sauce, and chili flakes in food processor and puree until the carrots are as fine as you can get them – mine always seems a little chunky. Enjoy! It’s yummy!

Gut Friendly “Nutella”

Even cavemen need a chocolate fix. Especially this one. This version of that amazing chocolatey hazelnut spread is made with dark chocolate, local honey, and sprouted hazelnuts. The truth is that hazelnuts don’t actually “sprout” when you soak them, but they still reap the same benefits from the process. Nuts can be pretty hard for some people to digest. Nuts are also high, and in some cases higher than grains and legumes, in Phytic acid. Why does this matter? I have understood Phytic acid as an “anti-nutrient”: When Phytic acid is consumed, it binds to other nutrients, such as iron, magnesium, chromium, calcium, and manganese, and once bound, it cannot be absorbed in the small intestine. Phytic acid can also interfere with the important enzymes we need for digestion. I personally like this article from Mark’s Daily Apple for some basic advice when it comes to nuts. Fortunately, soaking and sprouting nuts can reduce their amount of phytic acid, which makes it easier for us to absorb all those healthy nutrients we know nuts to be loaded with! Different nuts have different soaking and sprouting times, so used this website as a reference.  You don’t have to give up your favorite snack, but try this process and see if it makes a difference in how you feel! There’s nothing better than a happy tummy!

So back to the chocolate part…. This chocolatey spread is pretty much perfect on anything, and dangerously good on a spoon. As I mentioned before, hazelnuts don’t actually sprout after you soak them as some nuts do, but in soaking them we are still able to make them more gut friendly. I simply soaked mine in warm, filtered, water with about a teaspoon of sea salt for 12-15 hours. Then I rinsed them thoroughly, and left them out to dry until I was ready to use them. Soaking them for this recipe is perfect not only for the health benefits, but it softens them up before putting them in the food processor. I sweetened my batch with some local honey; it’s my favorite for those healthy probiotics, but you could easily use something different if you don’t care for honey or want to make a vegan version of this recipe. Enjoy Life brand chocolate chips are the best option for anyone avoiding gluten, dairy, or soy. They offer a really high quality product and the label boasts only 2 ingredients – can’t beat that!! This recipe fills about 3/4 of a mason jar, and can be stored in the fridge for about a week. Enjoy!

Chocolate Hazelnut Spread

1 c. Soaked, raw hazelnuts0301151239a~2
1 c. Enjoy Life dark chocolate chips, melted
1/4 c. Full fat  canned coconut milk
2 tbls. Virgin coconut oil
1 tbls. Honey (or vegan alternative)
1 tsp. Vanilla
Pinch sea salt

Grind hazelnuts in food processor until they just start to stick together. Add coconut oil, vanilla, and salt and continue to process. Meanwhile, in a double boiler, melt one cup chocolate chips. Add melted chocolate and coconut cream to food processor and blend until smooth. Store in glass jar, lick the spoon.

Sweet and Spicy Anti-Inflammatory Tea


sedona

I’m on a mini Christmas vacation right now. It’s amazing. I pretty much spend all my time running, cooking, and playing outside. Friday, we took a little day trip up to Sedona. It’s my new favorite place… ok, ONE of them. – I have lots of favorite places. Brian probably got sick of hearing me say “Wow.” and “OMG… Just LOOK!” We had an awesome little hike and even enjoyed a little SNOW! It was a really nice little surprise, but we were both happy to be back down in the sunshine after our hike. Still not a fan of cold weather. sedona3

For Christmas I got Brian a pair of cowboy boots, and Saturday we checked out a few awesome boot shops so he could pick out a pair. I had a really hard time not shopping for myself. I’m a cowboy boot girl from way back. Anyway, he picked out (I helped!) this really awesome pair and now he can be like a real cowboy – hah! Yeah, probably not -we’re true blue Mainers… but he did promise me a two-step lesson at Buffalo Chip!
1228141551~2~2 (1)

They’re gorgeous. I’m a little jealous.

Ok, so now on to the other fun stuff, which is this yummy tea I made the other day. It’s made with fresh turmeric root (a.k.a. not the orange powder you’ve probably had in your spice cupboard since the last time you made Indian food) and fresh ginger. Turmeric is highly touted for being a powerful anti-inflammatory as well as being great for digestion and your immune system.  It is also said to help reduce muscle soreness after exercise! Here it’s combined with Ginger, another digestive aid and source powerful antioxidants; honey, healthy bacteria and immune support; coconut milk, which has healthy fats galore; and cinnamon and cayenne for a delicious, spicy kick! Try it hot or iced for a SUPER healthy treat!


1228141548a~2
Sweet and Spicy Turmeric Tea

2/3 c. Canned light coconut milk
1/3 c. water
2 tsp. Fresh turmeric (about 1 1/2 inch “nob”) peeled, and finely grated
2 tsp. Fresh ginger, peeled, and finely grated
2-3 tsp. Honey
Pinch sea salt
A few dashes of cinnamon
A few dashes of cayenne pepper (optional)

Whisk all in a small sauce pan and heat over medium low until steaming hot but not quite boiling. Remove from heat, cover, and steep at least 10-15 min. Strain into mug, top with boiling water, stir, and enjoy! Chill for an iced version that might be even better than the hot!


Long Run Fuel: Quinoa Veggie Rolls and Homemade Pickled Ginger

Until I started running I didn’t eat quinoa. It doesn’t fall into a strict Paleo diet, and I really had no use for the excess carbohydrates. Now that I am doing a lot more aerobic exercise, quite often for prolonged periods of time, the carb is sort of a “must-have” and as far as grains go, quinoa is a pretty good option: it’s gluten free, contains a broad spectrum of amino acids, and technically falls under the category of “pseudo-grains” or grain-like seeds.

I don’t think I’ve met anyone who wasn’t a fan of sushi. Even those who aren’t big on raw fish (I personally can take it or leave it) can enjoy all those wonderful sushi flavors in a veggie roll.  While going out for sushi can be an expensive venture, making it at home is cheap, easy, and really fun!!

Well cooked quinoa takes on a sticky consistency and therefore makes a fantastic replacement for sushi rice!
This recipe yields 2 rolls, so if you’re cooking with the family you’ll want to double or triple the amount of quinoa that you make. Nori, or roasted seaweed, sheets are easily found in most grocery stores in the ethnic food section.

Sticky Sushi Quinoa
1/3 c. Dry quinoa
1 c. Water
1 tbls. Rice vinegar

In a small or medium sauce pan, combine quinoa and water. Bring to a boil, then simmer on medium for 10-15 minutes, until the quinoa is mostly cooked and there is only a tiny bit of water left in the pan. Turn off the heat, add the vinegar, cover, and let sit for 5-10 minutes until all the water and vinegar is absorbed and the quinoa is very soft and sticky. Cool Slightly.

Time to get rolling!

Sushi Fillings
Finely sliced carrots, cucumber, and avocado are my favorites, but you could also experiment with bell pepper, lettuce, kale or zucchini. Try out different combinations and see which one you like best!

2014-08-16 13.19.26

Lay the nori on a clean, dry surface shiny side down. Spread a layer of quinoa evenly over the bottom 2/3 of the nori sheet. Using the quinoa while it is still warm helps soften the nori and makes it easier to roll. Spread your toppings in a line along the bottom of the sheet and begin to roll tightly, but gently, from the bottom up. When you get to the portion of nori where there is no quinoa, dip your fingers in some water and wet the top of the sheet – this is what makes it stick! Roll the rest up so that you have a neat “log”. Using a sharp knife, carefully cut into 1/2 inch slices.

2014-08-16 13.19.47

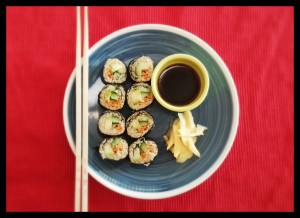
So, when I do go out for sushi, I’m that person that eats not only all of their own pickled ginger but the remainder of everyone else’s as well. I LOVE anything ginger. I just had to try making my own pickled ginger – with honey instead of sugar! It is definitely stronger than the stuff you’re used to being served at sushi restaurants, but if you’re anything like me, that’s a good thing!
It is really easy to make, and keeps for a very long time in the fridge!

Pickled Ginger with Honey

8 oz. Fresh ginger root, peeled and sliced paper thin.
1/4 c. Honey
1 c. Rice vinegar
1 tsp. Salt

Using a mandolin or vegetable peeler, slice the peeled ginger into paper-thin slices. In a bowl, combine ginger and salt and let sit for 30 minutes. Put into clean jar. In a small sauce pan, heat vinegar and honey over medium heat and bring to a boil.  Once boiling, pour vinegar over jar of ginger. Cool, cover, and refrigerate for several days. Taste-testing is the best way to know when it’s ready!

Green Mango and Tomatillo Salsa

I LOVE fresh salsa! It is one of my favorite things to make in the summer time. We love to eat it on top of grilled meat, fried eggs, and salads, or piled high on plantain or tortilla chips. “Tortilla chips are paleo?!”, you may ask. No. No, they’re not. Corn is a grain. But tortillas ARE delicious, and salty, and crunchy, and by far my favorite non-paleo treat. Tortilla chips and peanut butter – those are my biggest weaknesses by far, and I don’t let my self feel too guilty about enjoying one or the other every couple of weeks.  Today, I feel that I simultaneously worked off last night’s tortilla chips and earned tonight’s tortilla chips with my trail run this morning, so it’s all good.
This green mango salsa came out perfectly sweet, spicy, and fresh! It was also a great use for my *freezer pesto, that I almost always have on hand.  It’s a great way to use extra herbs – whether you’ve had a bumper crop in your garden, or picked up too much on sale at the grocery store. In this case, I used my jalapeno and cilantro pesto. To make, just blend cilantro, jalapeno, garlic, olive oil, and lime juice in a food processor until it is smooth. Then, pour into a zip lock bag, and smooth it out flat so that when it is frozen you are left with a “sheet” of pesto. You can break off what you need and keep the rest stored in the freezer.
Ideally, you would throw the tomatillos on the grill to get that nice charred skin. But here, it’s 106 degrees, and I just didn’t feel like hauling all my stuff down to one of the community’s grills, cleaning it, and standing outside to cook them. So, I took a short cut and sliced them, coated them in olive oil, and roasted them under the broiler until they were golden. If you are going to grill them, just remove their papery husk and pop them on the grill until they are softened and slightly blackened.
Green mango has a slightly tart flavor, and a really nice firm texture. It is not as overpoweringly sweet as the ripened version, which is what I think makes it perfect in salsa. It is also a little easier to work with when it is not soft and spilling juice all over the place. Just choose a mango that firm but not too hard, and only just starting to turn red/yellow at the top.
This salsa is delicious over grilled chicken and served along with one of Brian’s “Wicked Pissah Margs” – Stay tuned for this great, (almost) guilt-free version of a traditional margarita!
2014-08-10 17.32.06
Green Mango and Tomatillo Salsa

4 Tomatillos, grilled, or sliced and broiled
1 Green (under ripe) mango
1 Bell pepper, diced
1 Jalapeno pepper, finely diced
3 Scallions, sliced
1 Lime, juice and zest
1 tbls. Cilantro Jalapeno freezer pesto*, or chopped fresh cilantro
Black Pepper

Peal husk from tomatillos and slice into thick slices, coat with olive oil, and broil in glass baking dish until charred, or grill whole tomatillos until charred and softened. Cool, chop, and toss into large mixing bowl. Peal mango with vegetable peeler, slice off from pit, and dice. Add to bowl  along with bell pepper, jalapeno, scallion, lime zest and juice, and cilantro pesto. Sprinkle with black pepper, mix and serve!

Cranberry Bison Bites

“Well, you’ll either come out of this alive, dead, or sterile”.  I’m not kidding, I actually heard this said from one cowboy to another Friday night. We ventured north to checkout a place called Buffalo Chip Saloon in Cave Creek, AZ to check out some live bull rides, music, and country swing dancing.   Think bar meets rodeo. Apparently, you can even ride your horse there, I found Mae Bell hitched up in the corner. You  just never know what you’re going to find when you move to a part of the country that is so drastically different from where you came from.

0801142106


The south west is a non stop adventure. 

0801142050

And for the perfect cowboy (or caveman) snack, Cranberry Bison Bites! These bite sized meat balls are flavored with spices, cranberries, and just a hint of molasses. Perfect after hitting the trail, whether on a horse or on your feet!

2014-07-31 20.33.39

Cranberry Bison Bites

1 lb. Ground Bison
1 lb. Ground Grass Fed Beef
1/2 c. Dried Cranberries
2 tbls. Blackstrap Molasses
2 tsp. Sage
2 tsp. Fennel Seeds
2 tsp. Rosemary
2 tsp. Thyme
1 tsp. Onion Powder
1/2 tsp. Celery Seed
1/2 tsp. Garlic Powder
Salt and Pepper

Combine all in a large bowl and work with your hands until everything is well incorporated. Roll into bite sized meat balls and spread on sheet pan. Broil about 15 minutes until they are browned on the top. How easy is that?! Enjoy!

0801142107a