Gut Friendly “Nutella”

Even cavemen need a chocolate fix. Especially this one. This version of that amazing chocolatey hazelnut spread is made with dark chocolate, local honey, and sprouted hazelnuts. The truth is that hazelnuts don’t actually “sprout” when you soak them, but they still reap the same benefits from the process. Nuts can be pretty hard for some people to digest. Nuts are also high, and in some cases higher than grains and legumes, in Phytic acid. Why does this matter? I have understood Phytic acid as an “anti-nutrient”: When Phytic acid is consumed, it binds to other nutrients, such as iron, magnesium, chromium, calcium, and manganese, and once bound, it cannot be absorbed in the small intestine. Phytic acid can also interfere with the important enzymes we need for digestion. I personally like this article from Mark’s Daily Apple for some basic advice when it comes to nuts. Fortunately, soaking and sprouting nuts can reduce their amount of phytic acid, which makes it easier for us to absorb all those healthy nutrients we know nuts to be loaded with! Different nuts have different soaking and sprouting times, so used this website as a reference.  You don’t have to give up your favorite snack, but try this process and see if it makes a difference in how you feel! There’s nothing better than a happy tummy!

So back to the chocolate part…. This chocolatey spread is pretty much perfect on anything, and dangerously good on a spoon. As I mentioned before, hazelnuts don’t actually sprout after you soak them as some nuts do, but in soaking them we are still able to make them more gut friendly. I simply soaked mine in warm, filtered, water with about a teaspoon of sea salt for 12-15 hours. Then I rinsed them thoroughly, and left them out to dry until I was ready to use them. Soaking them for this recipe is perfect not only for the health benefits, but it softens them up before putting them in the food processor. I sweetened my batch with some local honey; it’s my favorite for those healthy probiotics, but you could easily use something different if you don’t care for honey or want to make a vegan version of this recipe. Enjoy Life brand chocolate chips are the best option for anyone avoiding gluten, dairy, or soy. They offer a really high quality product and the label boasts only 2 ingredients – can’t beat that!! This recipe fills about 3/4 of a mason jar, and can be stored in the fridge for about a week. Enjoy!

Chocolate Hazelnut Spread

1 c. Soaked, raw hazelnuts0301151239a~2
1 c. Enjoy Life dark chocolate chips, melted
1/4 c. Full fat  canned coconut milk
2 tbls. Virgin coconut oil
1 tbls. Honey (or vegan alternative)
1 tsp. Vanilla
Pinch sea salt

Grind hazelnuts in food processor until they just start to stick together. Add coconut oil, vanilla, and salt and continue to process. Meanwhile, in a double boiler, melt one cup chocolate chips. Add melted chocolate and coconut cream to food processor and blend until smooth. Store in glass jar, lick the spoon.

For the Love of Chocolate!

The first step is admitting that you have a problem.

Sunday, 9:30pm
Me: I eat too much chocolate. You know, I really need to cut back. I’m just going to give it up completely until Valentine’s day. That’s like a week – perfect!
Brian: Ok. I can do that. I’ll do it too.
Me: Ok! Awesome!

Monday, 8:30pm
Brian: Damn. I just really want some chocolate!
Me: Me too…
Brian: I mean… how bad would it be if I just went to the store…
Me: Get wine too!!

I… have a problem.

Ok, so I’m a chocoholic. Hard core. I like chocolate so much I eat unsweetened baker’s chocolate, yes, that’s 100% cacao. It’s my second favorite to 90%. And yeah, I eat it pretty much every day.

And speaking of chocolate, I recently made these brownies for a Fleet Feet Scottsdale party, and ever since then people have been driving me crazy for the recipe. So here it is, people! It’s my go-to desert recipe for sure. The recipe comes from Juli Bauer, co-author of the book The Paleo Kitchen, and creator of the blog, Paleomg.

They are the perfect brownie!! Sweet, with out having too much added sugar, fudgy, and super chocolatey! They have a really nice texture, which can be hard to come by in paleo baking, and the recipe is pretty much impossible to screw up – they come out perfectly every time! I always make them in a muffin tin rather tan a baking dish. They seem to cook better that way, and it makes them easy to keep in the freezer and pull out individually. It also helps me not eat the entire pan with a fork.

Sweet Potato Brownies

1 Medium sweet potato, baked
3 Eggs
1/4 c. Coconut oil, melted
1/4 c. Honey or maple syrup
1 tsp. Vanilla
3 tbls. Coconut flour
2 tbls. Cocoa powder
1/4 tsp. Baking powder
1/2 tsp. Cinnamon
pinch of salt
3/4 – 1 c. Dark chocolate chips (the recipe only calls for 1/2 cup, but no way is that enough! I always do extra!!)

Preheat oven to 400. Slice sweet potato length-wise and place skin side up, on a cookie sheet. Bake for 20-30 min until fork tender. Cool, scoop flesh into a large mixing bowl, and mash.
Reduce oven temperature to 350.
To your mixing bowl, add eggs, melted coconut oil, honey, and vanilla. Mix well, then add remaining dry ingredients. Fold in chocolate chips.
Line a muffin tin with paper liners and fill with batter. They don’t rise very much, so you can fill each muffin spot pretty full. Bake 20-30 minutes until they feel firm to the touch. Cool, and devour!

Sweet and Spicy Anti-Inflammatory Tea


sedona

I’m on a mini Christmas vacation right now. It’s amazing. I pretty much spend all my time running, cooking, and playing outside. Friday, we took a little day trip up to Sedona. It’s my new favorite place… ok, ONE of them. – I have lots of favorite places. Brian probably got sick of hearing me say “Wow.” and “OMG… Just LOOK!” We had an awesome little hike and even enjoyed a little SNOW! It was a really nice little surprise, but we were both happy to be back down in the sunshine after our hike. Still not a fan of cold weather. sedona3

For Christmas I got Brian a pair of cowboy boots, and Saturday we checked out a few awesome boot shops so he could pick out a pair. I had a really hard time not shopping for myself. I’m a cowboy boot girl from way back. Anyway, he picked out (I helped!) this really awesome pair and now he can be like a real cowboy – hah! Yeah, probably not -we’re true blue Mainers… but he did promise me a two-step lesson at Buffalo Chip!
1228141551~2~2 (1)

They’re gorgeous. I’m a little jealous.

Ok, so now on to the other fun stuff, which is this yummy tea I made the other day. It’s made with fresh turmeric root (a.k.a. not the orange powder you’ve probably had in your spice cupboard since the last time you made Indian food) and fresh ginger. Turmeric is highly touted for being a powerful anti-inflammatory as well as being great for digestion and your immune system.  It is also said to help reduce muscle soreness after exercise! Here it’s combined with Ginger, another digestive aid and source powerful antioxidants; honey, healthy bacteria and immune support; coconut milk, which has healthy fats galore; and cinnamon and cayenne for a delicious, spicy kick! Try it hot or iced for a SUPER healthy treat!


1228141548a~2
Sweet and Spicy Turmeric Tea

2/3 c. Canned light coconut milk
1/3 c. water
2 tsp. Fresh turmeric (about 1 1/2 inch “nob”) peeled, and finely grated
2 tsp. Fresh ginger, peeled, and finely grated
2-3 tsp. Honey
Pinch sea salt
A few dashes of cinnamon
A few dashes of cayenne pepper (optional)

Whisk all in a small sauce pan and heat over medium low until steaming hot but not quite boiling. Remove from heat, cover, and steep at least 10-15 min. Strain into mug, top with boiling water, stir, and enjoy! Chill for an iced version that might be even better than the hot!


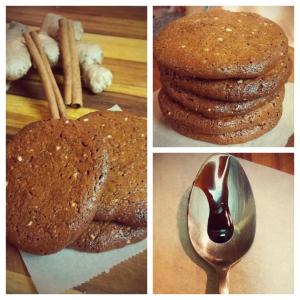
Chewy Molasses Gingersnaps

Every year after Thanksgiving, I spend an entire day in the kitchen with my Mom baking cookies. Like, LOTS of cookies. We prepare an assortment of family recipes and pinterest ventures, freeze them, and a few days before Christmas set up boxes all over the dining room table, fill them, and deliver by foot to all the neighbors. Extras, if there are any that have not been scoffed up by passersby in the kitchen, get served at various family gatherings.  For me, this year is one of new and different Christmas traditions, but it still just wouldn’t seem like the holidays if I didn’t bake cookies.

I can’t believe that these cookies turned out PERFECT on the very first try! Talk about a Christmas Miracle… Gingersnaps are definitely my favorite Christmas cookie. This Paleo – friendly version is not exactly guilt free, but the best cookies really shouldn’t be. Plus, I know you’re all going to go out and run it off anyway!

2014-12-21_18.51.29

Chewy Molasses Gingersnaps

1 c. Unsalted Almond Butter
1 c. Coconut Palm Sugar
1/4 c. Black Strap Molasses
1 Egg
1 tsp. Vanilla
2 tsp. Cinnamon
1 1/2-2 tsp. Fresh Grated Ginger
1/2 tsp. Nutmeg
1/2 tsp. Cloves
Pinch Salt

Preheat oven to 350.
Mix coconut sugar, spices, salt, and fresh ginger in large bowl.  Stir in almond butter, egg, molasses, and vanilla until everything is well incorporated. You’ll have a sticky dough. Spoon onto a parchment-lined cookie sheet about an inch or two apart from each other and bake 12-15 minutes until they begin to darken around the edges. Cool and enjoy! (Makes 18-20 cookies)

Merry Christmas!

How We Do The Margarita: A Word From Brian

Today, A little guest post from Brian, who shares how to make his self-titled, “Wicked Pissah Marg”. These drinks are a delicious and not-too-sweet take on the traditional Margarita. They’re super fresh and perfect for summertime!

………

Okay, so you might not get totally hammered off one of these, depends on how you mix ‘em I suppose, but I have to pay homage to my home state with the name. For those unfamiliar with the term “Wicked Pissah”,  I’ve included a link to the appropriate definition: Urban Dictionary: Wicked Pissah

Tequila is probably my favorite adult beverage, definitely in the top 3 anyway. The only problem is that when you go to a bar or restaurant they have no idea how to serve tequila. Your either going to end up doing shots, which I’m okay with sometimes, or you have two options for mixed drinks. Usually if you ask them to make sometime “different” you get a tequila sunrise, definitely not my favorite. The other option is to get a margarita, always good right? Not! At least in my opinion. I really can’t stand sour mix, it’s so sugary and fake tasting, but above all else I LIKE to taste the tequila in my drink! Now keep in mind, I don’t consume much in the way of food or drink that has any sweetener. This means your preferences may be different. Anyway, what follows is my answer to the usual margarita. No sweetener, no sour mix, just natural ingredients and alcohol! Remember, drink responsibly!

0813141828a~2~2

Brian’s Wicked Pissah Marg
Serves 2

-4 oz. Tequila (Hornitos, Patron, Tres Agaves, etc.) Find one you like to drink straight up and you’ll be set!
-1 oz. Triple Sec (I’m poor, therefore I bought the cheapest I could find. It serves my purposes.)
-Limes (1 or 2 is usually good)
-Seltzer water (Lime or lemon/lime works well)
-Ice
-Salt (optional)
-Having a cocktail shaker really helps. You could probably just stir in a class if needed.

Directions:

Add ice to your cocktail shaker, this helps to keep your drink cold! After the ice is in, get your lime. I start by rolling out the lime with my hand, this helps soften it up so you can get more juice out of it. After it’s soft, cut it in half. If you stab the pulp side a few times with the knife you can get even more juice. Squeeze the juice over the ice, 1 lime will usually yield enough juice for 2 drinks. After I’ve juiced my lime I usually throw the squeezed wedges in the shaker for more flavor. Next is the fun part: Tequila! I’m going to leave the amount up to each person individually. As I’ve said before I like my margaritas to taste of tequila so I use more than I think I’m going to need.  Now that the tequila’s in, we can add the triple sec. Here’s your sweetener! – And more alcohol. If you want a little less tequila taste, and a sweeter drink, add more triple sec. Personally, I only add a splash, and I mean a very small splash.
Time to shake it out! Have some fun with it, maybe shake your booty while you’re mixing your drink. Or you can save this for AFTER the drink.
Okay, now that the drink is mixed, we need glasses! I use regular cocktail glasses but anything will work. Plastic cups are great if you’re going outside, pint glasses if you want a BIG margarita, or in my case cocktail glasses if you want to be a little fancier. So here’s the salt optional part; salt on the rim of your glass. It adds a nice contrast to the drink, but some people simply don’t like it. Either way is fine. If you are going to salt your glasses you should put a little salt on a plate, then wet the edge of the glass. It’s best if you use a wedge of lime and slide it around the edge of the glass, don’t lick them, people don’t appreciate that!
It’s good to have some ice in your glass to keep your drink cold while you drink it. Pour your drink mix into your glass, it probably won’t fill the entire glass – unless you’re going Wicked Pissah style. Once the drink mix is in the glass you can add the seltzer. I usually just fill the remainder of the glass with seltzer.
Once again you can tailor to your taste, less seltzer will be a stronger tasting drink. Other than offsetting the strength of the alcohol, the seltzer also adds nice effervescence!
The cherry on top is adding a wedge of lime to the edge of the glass, it looks good!

Time to enjoy!

-Brian

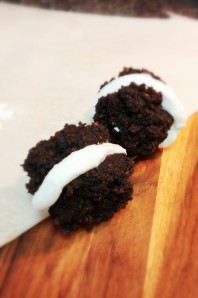
Mini Plantain Whoopies

That’s right. I just Paleo-fied the Whoopie pie. I’m sure there are many Mainers out there that probably see this as a horrible act of sin. I’m sure some of your relatives just rolled over in their grave. I, however, was recently informed that I would never be a true Mainer because I was technically born just over the New Hampshire border – So I have no qualms with reworking this wonderfully delicious Maine tradition. Hey, I’m “from away”. It is absolutely true that if you compared these side by side to your Grandmother’s Whoopie pies, they wouldn’t stand a chance. Not even a little one. But as a Paleo alternative to the real deal, they are WICKED good!!

0805141442~2
Mini Plantain Whoopie Pies
2 Plantains, pealed and sliced length-wise
1/4 c. Coconut oil
3 tbls. Maple syrup
1 tsp. vanilla
3 Eggs
3 tbls. Coconut flour
3 tbls. Cocoa powder
1/2 tsp. Cinnamon
1 tsp. Baking powder
Pinch of salt

Filling
1 Can full fat coconut cream, separated * (use only the concentrated part from the top of the can, not the liquid in the bottom)
1/2 tsp. Vanilla
1 tsp. Maple syrup

Heat oven to 375. Peal Plantains by cutting each end off, scoring the peal length wise and pealing off. Cut plantains length wise and place in glass baking dish. Cover with foil and bake 15 minutes until they are soft. Reduce oven temperature to 350.
In a food processor, blend plantains until smooth. Add coconut oil, maple syrup, and vanilla and process to mix. Pour mixture into large mixing bowl and stir in eggs. Mix in dry ingredients. It should be a thick batter. Spoon onto parchment lined cookie sheet and bake at 350 for 20-25 minutes until firm. Cool completely.

Scoop the top half of coconut cream out of the can and into a bowl or blender. You want to use the concentrated, thick, cream. Whip or blend in maple syrup and vanilla. Chill.

The soft plantain cookies are just perfect as a stand alone, but spread a layer of cream between them and now you’re Makin’ Whoopie! Enjoy!

*You really need a can of coconut cream that is separated, so that the fatty part is all at the top of the can when you open it. You can sort of tell by shaking the can – if it sounds like liquid is moving around in there, than it is not separated. Yes this means that you might look like an idiot standing in the aisle at the grocery store shaking all the cans of coconut cream. But trust me – it’s all worth it.  You can also store your can of hopefully separated coconut cream in the refrigerator to help it along. If your filling comes out a little more like whipped cream than frosting, that OK. They’re equally delicious, and just a little messier to eat!

0805141447~2

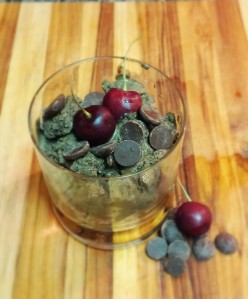
Double Chocolate Cherry (Kale) Ice Cream… Dairy Free and Guilt Free

Well, I did it again. I made a dessert. But I don’t think it really counts because it has vegetables in it.
The best part is, you and your family will never even know that there is kale in there! In fact, that’s why I put the kale part in parentheses, because if you are serving this to friends or family, you may want to leave that part out. I don’t know, I mean, I would get excited about kale in my ice cream, but I can see how others… wouldn’t.

2014-07-29 05.43.54

Double Chocolate Cherry (Kale) Ice Cream
4 Large kale leaves, stems removed, about a blender-full.
1 Can full fat coconut milk
3 1/2 c. Frozen or fresh pitted cherries
4-5 tbls. Cocoa powder
1 tsp. vanilla
pinch of salt
3/4 c. Dark chocolate chips
**Optional Honey for sweetness

Start by washing and removing the stems from the kale. Rip into smallish pieces and fill your blender. Cover with half of the coconut milk. Now, hopefully you have and awesome blender that powers through that kale, but if yours sucks like mine does, that’s OK too, you may just need to help it along a little bit by pulsing and stirring. Blend until the kale is VERY smooth – you definitely don’t want any chewable-sized pieces of kale in your ice cream. That would be gross and would definitely give you away. Add the rest of the coconut milk, cocoa powder, vanilla, and salt. Blend. Add cherries and blend until smooth. Add 1/2 c. chocolate chips and pulse briefly to chop the chips. Pour into large bowl, stir in 1/4 c. chocolate chips and put in freezer. Stir every half hour until it starts to become frozen just to prevent it from becoming a solid block. You may still need to let it thaw on the counter for a few minutes before serving.

**I made this without any sweetener, but if you prefer a sweeter taste, add a tablespoon or two of honey or maple syrup.

One of the unfortunate things about frozen cherries is that when you can find them, they tend to be really expensive (like 8-10 bucks at Wholefoods…).  About a week ago, when fresh cherries were on sale for 99 cents a pound, I stocked up, pitted, and froze a ton of them. A little of extra work, but totally worth it! I always try to utilize my freezer and pick stuff up when it’s on sale or in season, it saves time and money later.  Another thing I do to save time and energy later in the week is to freeze my meat in marinade. Take some extra time when you get home from the grocery store and whip up some marinades. They don’t have to be complicated – think something acidic (vinegar, citrus juice, salsa, etc.), some spices, maybe some oil, and salt and pepper. Boom! Marinade! Then just pop it all in a freezer bag, let it sit for a few hours in the fridge and then throw it in the freezer. Later in the week, you can just thaw it, and cook it, and not have to think about what you’re going to do to that bland package of chicken breast you picked up.

How We Do Coffee

2014-07-28 05.46.59

If you have not tried putting coconut oil in your coffee, than you really, really must.  If not for all the wonderful health benefits of coconut oil, than for the rich, amazing, frothy goodness that comes from blending it with your morning java.  It is loaded with healthy saturated fat that helps keep you full, keep your blood sugar levels steady, and give you an extra kick of energy – with out extra jitters! For me it is not only a wonderful way to start my day, but the perfect get-up-and-go fuel for my run!

Now, you could just plop a teaspoon or two into your hot cup of joe, but the consistency is a little weird. You end up with big fat blobs on the top of your coffee that are… less than palatable. But, if you combine 1-2 tsp. of unrefined coconut oil with a mug full of coffee in the blender, magic happens! The result is a creamy, frothy, coconut latte! I like to add a few drops of vanilla extract, or a tiny bit of cocoa powder. In the fall I like to add cinnamon, nutmeg, and cloves for a homemade pumpkin spice latte, and sometimes if I need a little extra boost in the morning before a long run, I’ll add a teaspoon of honey. The possibilities are endless!

For the ultimate “bullet-proof” coffee, Brian likes to also add a teaspoon of unsalted butter. He’s hardcore.


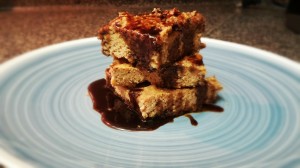
Butternut Squash Bars with Blackstrap Molasses Caramel Sauce

There was a time in my life when I was ALL ABOUT the desserts. I used to have a colossal sweet tooth, but these days, I’m just kind of over it. As I started eating fewer sweets and less sugar, my cravings for it disappeared. Now I’d take some dark chocolate and a glass of wine over a cookie any day…..

But it’s true that sometimes you just get the urge to bake! These butternut squash bars are a yummy treat that you don’t have to feel (too) guilty about!  Sweet, nutty butternut squash and spices make a delicious bar topped with blackstrap molasses that has been cooked down with butter to make a sweet caramel. You can even leave the sauce off for a sugar-free option – perfect for breakfast, or recovery after exercise.

2014-07-21 15.53.54

Butternut Squash Bars with Blackstrap Molasses Caramel Sauce

1 c. Butternut squash, cooked, mashed, and cooled (canned version works for an easy shortcut), squeeze any excess water out with fine strainer or cheese cloth.
1/4 c. Coconut Oil (melted, or softened)
1/4 c. Almond Butter
3 eggs
1 tsp. Vanilla
1/4 c.  Coconut Flour
1/4 tsp. Baking Powder
2 tsp. Cinnamon
1/2 tsp. Nutmeg
1/2 tsp. Ginger
1/4 tsp. Coves
Salt

Caramel Sauce:
2 tbls. Unsalted Butter
1/4 c. Blackstrap Molasses*
2 tbls. Coconut Milk


Half butternut squash length-wise, scoop seeds, and place in glass baking dish, skin side up. Add about 1/4 inch water to the bottom of the pan, and roast at 375 for about an hour, until the squash is soft. Cool, scoop flesh out, and using a fine strainer or cheese cloth, press or squeeze some of the excess water out of the squash. Put in bowl, and reserve for later.
Reduce oven temperature to 350 degrees.
Grease an 8×8 baking dish (liberally).
In a mixing bowl, combine squash, oil, almond butter, eggs and vanilla and whisk until the almond butter is well incorporated. Add remaining ingredients and whisk.  Spread into baking dish, and bake at 350 for 50-60 minutes. Until a knife inserted into the center comes out clean, and the top feels very firm.

While the bars are baking, Melt butter in a small sauce pan, add molasses and coconut milk. Over medium heat, and whisking continuously, bring to a boil. Continue to whisk as sauce starts to thicken. Cook down to desired consistancy (sort of thick and gooey) making sure to whisk constantly. It will burn very quickly if  you stop!

Once the bars have cooled, slice into squares and serve drizzled with the warm caramel sauce.

*Blackstrap Molasses is what remains after the maximum extraction of sugar from the raw sugar cane. It remains after the third boiling of sugar syrup. I like to think of it as the bottom of the barrel after they make molasses. It has a much stronger flavor and less sugar than regular molasses and is also much richer in nutrients such as vitamin B6, calcium, magnesium, iron, potassium and manganese.